
HOW TO INSTALL DEBIAN LINUX(PARROT)
- BLIND HACKER

- Feb 25, 2018
- 3 min read

So, let’s kick off with something a bit basic, installing Debian Linux (parrot)…
Our requirement:
-4gb usb Flash drive
-Parrot Debian Iso (https://www.parrotsec.org/download-full.fx)
-Iso to usb bootable (I will advise you download Rufus https://filehippo.com/download_rufus/ )
-Obviously a laptop (with at least 30gb free hard drive space)
First Step:
After getting all the requirement, insert you flash drive to your computer and run Rufus as administrator.
Then fill in the box with the image below

So, as you can see, the parriot os was selected and we can start to make the flash drive bootable
Step 2:
After that is complete, you would want to go to the advance page on your laptop by holding shift key + clicking the restart button
It looks like this

Click on the Troubleshoot for more advance options, this is where we test you skills

You will want to change your UEFI FIRMWARE SETTINGS to accept the flash drive boot the PARROT OS by clicking UEFI FIRMWARE SETTINGS , and restarting your pc.
Step 3:
So the firmware setting brought up to display, click F10 for boot options and you’ll get this as a display

Now, you will have to navigate to system configuration
And change the following in accordance with the picture below


Then click F10 to save changes
Step 4:
Remember that flash drive, yes that flash drive we ran Rufus on , plug it into computer and shutdown your computer. Switch it back on and this should appear!!!
Using the Down Arrow, scroll down to the “Install” option and hit Enter

You should be at the screen below, where you can choose the type of installer to use. In this case, we shall use the “Standard Installer” or GTK GUI, therefore, scroll down to it and hit Enter.

Then, select the language you will use for the installation from the next screen and press Enter.

In the interface below, you are required to select your current location, simply scroll down and choose your country from the list.

Thereafter, configure the keyboard by choosing the keymap to use and press Enter.

You will see the screen below, which indicates additional components are being loaded.

On the next screen, setup user and password. From the interface below, enter a root use password and hit Enter

Next, setup a user account. Firstly, enter the full name for the user in the screen below and subsequently, set the username and password as well in the next screens, then press Enter to advance.

After setting username and password, at this point, you should be at the “Partition disks” screen below. From here, move down to the “Manual” option and hit Enter to advance.

Next, you will view a list of the current disk partitions on your hard disk from the interface below. Select the disk partition, which in my case is the 34.4 GB ATA VBOX HARDDISK, by scrolling to highlight it and continue by pressing Enter.

Note: In case you have selected an entire disk to partition, you will be prompted as below, choose <Yes> to create a new empty partition table and continue.

Now, select the free space created and advance to further instructions.

Go on to select how to use the new empty space, choose “Create a new partition” and proceed by pressing Enter.

Now create a root partition with 30GB size and hit Enter to create it.

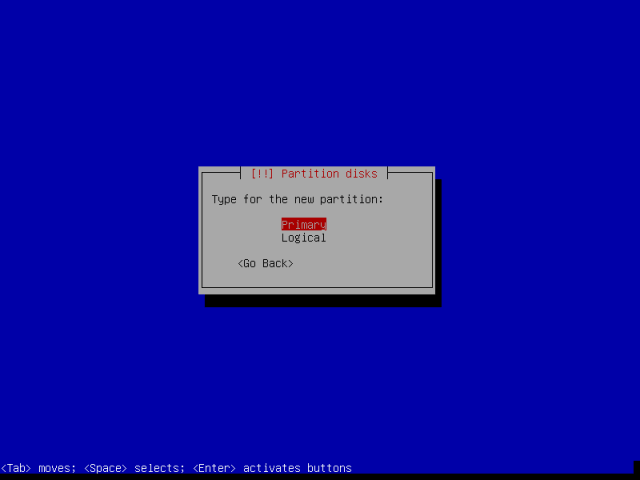
Then, make the root partition primary as in the interface below and proceed to the next stage.
Thereafter, also set the root partition to be created at the beginning of the available free space and press Enter to continue.

Now you can view the interface below, which displays the root partition settings. Remember that the file system type (Ext4) is selected automatically, to use another file system type, simply hit Enter on “Use as” and select the file system type you want to use for the root partition.
Then scroll down to “Done setting up the partition” and continue by pressing Enter.

When you have created the partitions, you will be at the screen below. Move down to “Finish partitioning and write changes to disk”, then hit Enter to proceed.
Select <Yes> to accept and write changes to disk and then advance by pressing Enter button.

At this point, the system files will be copied to disk and installed, depending on your system specifications, it will take a few minutes.

At a certain point, you will be asked to choose the disk in which the Grub bootloader will be installed. Select the primary hard disk and press Enter to continue and Yes to confirm on the next screen to finish the installation.

In the screen below, hit enter to finish the installation process. But the system will not reboot immediately, some packages will be removed from the disk, until that is done, the system will then reboot, remove the installation media and you will view the Grub boot loader menu.

At the login prompt, enter your username and password to login.


AND THAT'S IT FOR THE WEEK!! DON'T FORGET TO LIKE AND SUBSCRIBE
Comments